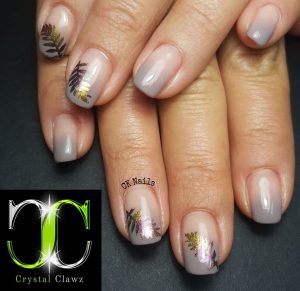
 Perfecting it can be a bit challenging, though, especially when you’re under the watchful eyes of your clients. Here are some tips to help you learn how to paint ombre nails your clients will love.
Before You Blend
Before jumping in, it’s important to consider a few details. Color choice, for example, can make or break an ombre look, so when selecting colors, pick shades that are similar in tone and brightness. As you’re starting out, choose pairings that are already good complements to each other, like pink and orange or teal and blue, as you’ll have an easier time blending these combinations. As you master the ombre look, though, try bolder color combinations like black and white to leave your clients’ nails looking fierce. Your client’s nail shape is another important factor to consider. Longer nails look beautiful with a subtle, minimal nail style, while shorter nails hold up well to dark color blends. Once you’ve chosen your colors and assessed your client’s nail shape, it’s time to try one of the following ombre methods.Method 1: The Sponged Style
This ombre nail technique works best with traditional nail polish. Grab a wedge-shaped makeup sponge and two polish colors, and follow these steps to create the perfect ombre.- Before beginning, cut a thin strip of the makeup sponge. This will help keep the ombre contained and will minimize cleanup on the surrounding skin.
- After applying your base coat, apply one thin coat of the lightest chosen nail polish to the nail.
- Paint parallel horizontal stripes of each of your colors side by side directly onto the surface of the makeup sponge.
- Lightly tap the sponge onto the nail, reapplying the polish to the sponge as needed (usually after 2-3 nails). As you’re tapping the sponge, move it slightly up and down the surface of the nail to blur the area where the colors meet.
- Repeat step four until you’ve built the ombre to your desired level of blendedness.
- If any polish has gotten on the surrounding skin, use a cotton swab dipped in nail polish remover to clean them.
- Finish the look with a glossy topcoat for a perfect shine!

Method 2: The Brushed Blend
The brushed blend technique is the best way to get a perfectly blended ombre using gel polish. All you’ll need are two gel polish colors and a lint-free nail wipe.- After applying and curing your base coat, paint one of your chosen gel polish colors on the left side of the nail, slightly overlapping the vertical center line.
- Brush your second color onto the right side of the nail, and then use the polish brush to blend the two colors in the center of the nail by stroking downward along the center line multiple times until the uncured colors begin to mix together. Be sure to wipe your polish brush on a lint-free nail wipe before returning it to the bottle to avoid color transfer.
- Clean any excess gel polish from the surrounding skin, and then cure the first color coat in your LED or UV lamp.
- Repeat the second and third steps to ensure good color coverage and a smooth, blended center.
- Apply your gel polish topcoat and cure again. Cleanse the nail, and finish with a nourishing cuticle oil.
 Matching the best technique to the best product will ensure you end up with beautifully blended results. Practice makes perfect, of course, but if you follow these tips, you’ll learn how to paint ombre nails in no time.
If you loved this blog, visit our website for our latest posts: https://www.crystalclawz.co.za/
Credit: Sarah Waite


